This guide builds up to launching an arbitrary number of GPU cloud instances with pre-loaded parameters. This allows for the distribution of lengthy tasks onto CUDA cores. This is extremely useful for running a series of Deep Neural Networks with different parameterisations !
You will need an AWS account set up: See previous blog
Contents
- Set Up IAM Access Key
- Install with
pip - Configure CLI
- Create Security Group, Key-Pair and Role
- Create an Instance from the CLI
- Connect
- Terminating an Instance
- Tagging Instances
- Spot Requests with CLI
- Getting the Spot Prices
- Terminate Spot Instances
- References
Set Up IAM Access Key
To use the CLI you need an IAM access key and code pair
- Navigate the AWS IAM portal
- Select Users in the left navigation pane
- Create New User
- Enter a user name & click Create
- Download Credentials and store securely
Install with pip
This is the simplest method if you have pip
pip install awscliadd the flag --user if you don’t have root access. See the docs for other installation
options. To check the installation
aws --version
aws-cli/1.11.10 Python/2.7.12 Darwin/16.1.0 botocore/1.4.67
Configure CLI
Configure the default user by the command aws configure as follows
aws configure
AWS Access Key ID [None]: AKIAIOSFODNN7EXAMPLE
AWS Secret Access Key [None]: wJalrXUtnFEMI/K7MDENG/bPxRfiCYEXAMPLEKEY
Default region name [None]: us-west-2
Default output format [None]: json
A list of region codes can be found here
this creates two files at ~/.aws. This bash command will show the simple contents
for f in $(ls ~/.aws/)
    do echo -e "# start ~/.aws/$f"
    cat ~/.aws/$f;echo -e "# end file\n"
done
which could be edited by either running aws configure or editing the contents directly
# start ~/.aws/config
[default]
region = us-west-2
# end file

# start ~/.aws/credentials
[default]
aws_access_key_id = AKIAIOSFODNN7EXAMPLE
aws_secret_access_key = wJalrXUtnFEMI/K7MDENG/bPxRfiCYEXAMPLEKEY
# end file
See the docs for specifying additional users with different regions and keys.
Enable command completion by adding the following lines to ~/.bash_profile
# This is for the amazon web services CLI to enable autocompletion
complete -C '/usr/local/bin/aws_completer' aws
export PATH=/usr/local/bin/aws:$PATH
now refresh the ~/.bash_profile by
source ~/.bash_profilesee the docs if you installed without pip. Check the path to aws is correct by
which aws.
You can test by entering aws s and hitting TAB. I found the autocompletion was bit rubbish.
I had to TAB twice for it to display the first time
Create Security Group, Key-Pair and Role
The following command creates the security group example-name with
an example description
aws ec2 create-security-group \
    --group-name example-name \
    --description "an example description"
then you can add a rule to allow ssh traffic over port 22 for a specific ip range specified by
a CIDR (see below)
aws ec2 authorize-security-group-ingress\
     --group-name example-name \
     --protocol tcp \
     --port 22 \
     --cidr 0.0.0.0/0
If you’re lazy, leave it as is.To be more secure, determine your CIDR code from a range of IP
addresses from your router using the python module netaddr
import netaddr
start_ip = "63.223.64.0" # an example start ip
end_ip = "63.223.127.255"  # an example end ip
cidrs = netaddr.iprange_to_cidrs(start_ip, end_ip)
for cidr in cidrs: print cidr
You can now test this worked by running
aws ec2 describe-security-groupswhich will probably fail with the following result
An error occurred (UnauthorizedOperation) when calling the DescribeSecurityGroups operation: You are not authorized to perform this operation.
You can fix this by navigating again to the Amazon IAM portal
- Select Policies (and Get Started if you haven’t visited this page before)
- Filter
Policy Typebyadminin the top search bar - Select
AdministratorAccess - Click Policy Actions and Attach
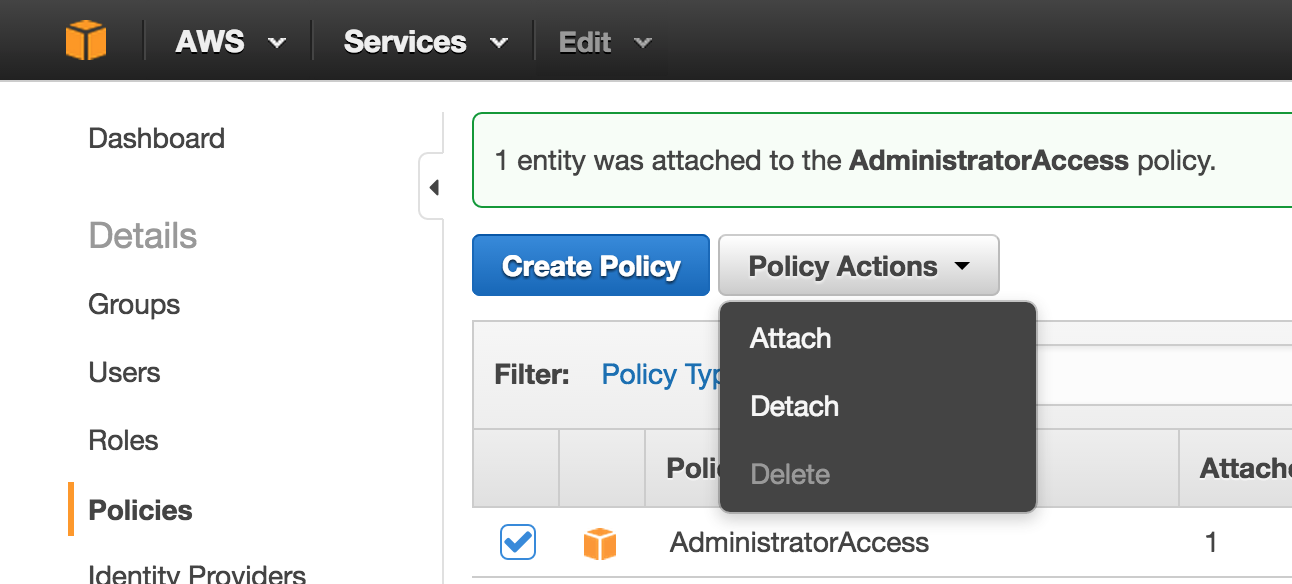
- Select your username if it asks you to
- Attach Policy
- Wait 10 secs or so and retry the command above which should return
JSON
If any errors are encountered, visit the StackOverflow thread as the required fix may change over time.
Create an Instance from the CLI
It is possible to create an ssh key directly through the CLI
aws ec2 create-key-pair \
    --key-name example-key-name \
    --query 'KeyMaterial' \
    --output text \
> ~/Downloads/example-key-name.pem
chmod 400 ~/Downloads/example-key-name.pem
This means you will have a new key for each session which is a bit more secure than the global
ssh key method described in the previous guide.
A new instance can be created with the following command, which returns the InstanceId when
successful. Note that this is a Free Tier request so it won’t bill and is ideal for playing with the
CLI
aws ec2 run-instances \
    --image-id ami-ed82e39e \
    --security-group-ids example-name \
    --count 1 \
    --instance-type t2.micro \
    --key-name example-key-name \
    --query 'Instances[0].InstanceId'
The full JSON response is filtered by --query 'Instances[0].InstanceId' where
'Instances[0].InstanceId' means selecting the first JSON value for the key Instances
and returning the value for the key InstanceId. More details on --query can be found in
the docs. When specifying an --image-id make sure it corresponds to the correct region.
In the case of an error code of (InvalidAMIID.NotFound) try specifying
--region eu-west-1 or the relevant region code.
The public IP for the instance can be returned by subsequently running
aws ec2 describe-instances \
        --instance-ids yourInstanceId \
        --query 'Reservations[0].Instances[0].PublicIpAddress'
alternatively, the DNS can be found by using
--query 'Reservations[0].Instances[0].PublicDnsName'This can simply be adjusted to return multiple instances with the following syntax
aws ec2 describe-instances --query 'Reservations[0].Instances[*].PublicDnsName'Connect
Connecting is straightforward and simply requires
ssh -i ~/Downloads/example-key-name.pem ubuntu@[PublicIp_or_DNS]and you can connect either the IP or the DNS specified. If you used a default key stored in
~/.ssh then -i /path/to/key.pem isn’t required. If you can’t connect and get
Operation timed out then try the following
aws ec2 describe-instances \
    --instance-id yourInstanceId \
    --query 'Reservations[0].Instances[0].NetworkInterfaces[0].Groups[0].GroupName'
and if it returns "default" then you messed up and blocked all incoming traffic which nicely
ties into the last section
Terminating an Instance
An instance may be terminated by
aws ec2 terminate-instances --instance-ids instance_idwhere multiple instances may be terminated through
aws ec2 terminate-instances \
    --instance-ids instance_id0 instance_id1 instance_id2
which is equivalent to specifying the full JSON
--instance-ids ["instance_id0", "instance_id1", "instance_id2"]for more shorthand notation see the docs
Tagging Instances
Instances may only be tagged after they are created through the command
aws ec2 create-tags --resources=yourInstanceId --tags Key=TestName,Value=TestNamehowever, it is possible to do this in one line through xargs and shell script as
aws ec2 run-instances \
    --image-id ami-ed82e39e \
    --security-group-ids example-name \
    --count 1 \
    --instance-type t2.micro \
    --key-name example-key-name \
    --query 'Instances[0].InstanceId' | \
xargs -I {} sh -c "
    echo 'InstanceId:'{}
    aws ec2 create-tags \
        --resources={} \
        --tags Key=Name,Value=TestName"
annoyingly there is no confirmation that the request was successful so I prefer to use this sh
code (you cannot do this with xargs)
SEC_GRP=example-name
KEY=example-key-name
ID=$(aws ec2 run-instances \
    --image-id ami-ed82e39e \
    --security-group-ids $SEC_GRP \
    --count 1 \
    --instance-type t2.micro \
    --key-name $KEY \
    --query 'Instances[0].InstanceId' \
    --output text)
echo 'Started InstanceId: '$ID
echo 'Creating Tags ...'
aws ec2 create-tags \
    --resources=$ID \
    --tags Key=Name,Value=TestName
echo 'Tags created: Key, Value'
aws ec2 describe-instances \
    --instance-id $ID \
    --query 'Reservations[0].Instances[0].Tags' \
    --output text
Spot Requests with CLI
Spot requests can be requested with the following command
aws ec2 request-spot-instances \
    --spot-price "0.050" \
    --instance-count 2 \
    --block-duration-minutes 120 \
    --type "one-time" \
    --launch-specification file://~/Desktop/test.json \
    --query 'SpotInstanceRequests[*].SpotInstanceRequestId' \
    --output text
This will output the SpotInstanceRequestIds that manages requests
--spot-priceis specifying a max bid price ofUSD$ 0.05--instance-count 2looks to launch2instances with the same parameters--block-duration-minutes 120means the request will stop at120if not already terminated or interrupted by a spot price rise--type "one-time"means that when interrupted / terminated no further instances will be launched
for more details and customisations see the docs. I would also recommend checking the
docs to make sure --spot-price isn’t changed to specify as units of 1000*USD$ !
The file ~/Desktop/test.json should contain something similar to
{
  "ImageId": "ami-0d77397e",
  "KeyName": "example-key-name",
  "SecurityGroupIds": [ "sg-youSecurityGroupID" ],
  "InstanceType": "m4.large",
  "Placement": {
      "AvailabilityvZone": "eu-west-1a"
    }
}
which specifies that we want m4.large instances in the eu-west-1a (Ireland) region with
the AMI ami-0d77397e (64bit Ubuntu) more detailed examples of --launch-specification
files can be found here
You can view the IDs of these requests by
aws ec2 describe-spot-instance-requests \
    --query SpotInstanceRequests[*].{ID:InstanceId}
If one or more are NULL then view the status by
aws ec2 describe-spot-instance-requests \
    --query SpotInstanceRequests[*].Status.Message
which will most likely show something like
[
    "Your Spot request price of 0.05 is lower than the minimum required Spot request fulfillment price of 0.081.",
    "Your Spot request price of 0.05 is lower than the minimum required Spot request fulfillment price of 0.081."
]
Getting the Spot Prices
The current spot price can be obtained from an API at this endpoint which
can be handled in python
import json
import operator
import requests

machine_type = 'p2.xlarge'
api_url = "http://spot-price.s3.amazonaws.com/spot.js"

print "Loading spots for Machine Type: {} ...".format(machine_type)
res = requests.get(api_url)
cleaned = res.content[len('callback('):-len(');')]
result = json.loads(cleaned)

# get all spots by region
reg_machine_spots = {
    region['region']:{
        size['size']: [
            os['prices']['USD']
            for os in size['valueColumns'] if os['name']=='linux'
        ][0]
        for it in region['instanceTypes'] for size in it['sizes']
    }
    for region in result['config']['regions']
}

# get all regional spots
spots = {
    region: prices[machine_type]
    for region,prices in reg_machine_spots.iteritems()
}

# print the prices sorted lowest first
ami_spots = sorted(spots.items(), key=operator.itemgetter(1))
for reg,spot in ami_spots: print reg.ljust(15) + spot
My command line version is available here and can be run as
./cheapest_spot.py -t p2.xlarge
check the StackOverflow post if the link is outdated but this should return something like the following and is very helpful for determining instant prices
Loading spots for Machine Type: p2.xlarge ...
us-west-2      0.1315
eu-ireland     0.1643
us-east        0.1887
apac-sin       N/A*
us-west        N/A*
ap-northeast-2 N/A*
us-east-2      N/A*
apac-tokyo     N/A*
apac-syd       N/A*
ap-south-1     N/A*
eu-central-1   N/A*
sa-east-1      N/A*
It is also possible to obtain the historic spot prices using the CLI as follows
aws ec2 describe-spot-price-history \
    --instance-types m1.xlarge \
    --product-description "Linux/UNIX (Amazon VPC)" \
    --start-time 2016-10-31T03:00:00 \
    --end-time 2016-10-31T03:16:00 \
    --query 'SpotPriceHistory[*].[Timestamp,SpotPrice]'
The historic time is limited and check the [docs][15] for latest details
Terminate Spot Instances
To cancel spot instance requests
aws ec2 cancel-spot-instance-requests \
    --spot-instance-request-ids sir-08b93456 sir-08b93458
where sir-08b93456 sir-08b93458 are not the instanceIds
The instances themselves should also then be terminated
aws ec2 terminate-instances \
    --instance-ids i-1234567890abcdef0 i-0598c7d356eba48d7
here the instance IDs are made explicit to differentiate them from the Spot Instance ID. Make sure to do both as you may end up having instances running without being aware !
References
- AWS Guide
- Set Up Amazon Elastic Compute Cloud (EC2)
- AWS IAM Portal
- AWS Guide: Installing AWS CLI
- AWS Region List
- AWS Guide: CLI Multiple Profiles
- AWS Guide: CLI Completion
netaddrdocs- StackOverflow: AWS CLI Client.UnauthorizedOperation even when keys are set
- AWS Guide: Filtering with the
--queryoption - AWS Guide: Shorthand Syntax
- AWS Guide: Using Spot Instance Request
- AWS Guide: Spot Request Examples
- StackOverflow: get ec2 pricing programmatically?